Creating a New Product
Introduction
To create a new product for your store, go into the Admin Interface, click the "Products" tab, and click the "New Product" button.
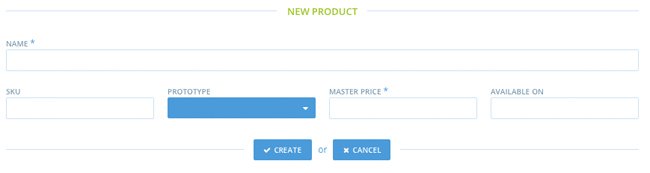
The two mandatory fields ("Name" and "Master Price") are denoted with an asterisk (*) next to the label. You can leave SKU blank. If you don't add a value for "Available On" the product will not be shown in your store.
Prototypes are a more complex topic, and are covered in their own guide.
Product Details
After you click the "Create" button, the Solidus application brings you to a more detailed product entry page, where you can input more information about your new product.
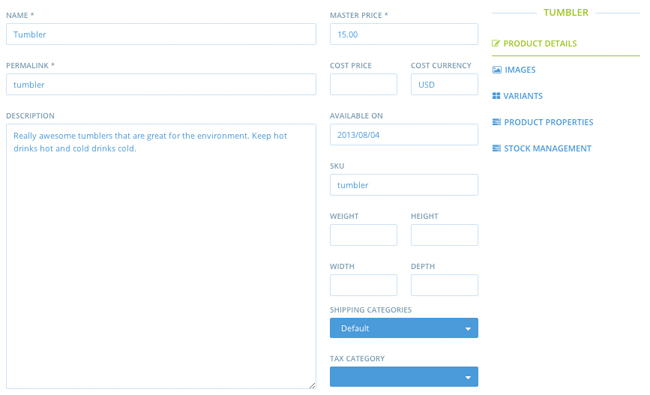
- Name - This field will either be blank, or the same as what you entered on the initial page. You can change this field whenever you like.
- Permalink - The permalink is automatically created by the application for you when the product is first saved, and is based on the product's name. This is what is appended to the end of a URL when someone visits the page for a particular product. You can change the permalink, but should exercise extreme caution in doing so to avoid naming collisions with other products in your database.
- Description - This is where you will provide a detailed description of the product and its features. The application gives you plenty of room to be thorough.
- Master Price - For now, just think about the Master Price as the price you charge someone to buy the item. Later in this guide, you will learn more about variants and how they impact a product's actual price.
- Cost Price - What the item costs you, the seller, to purchase or produce.
- Cost Currency - It may be that the currency used when you purchased the product is not the same as that you use in your store. Solidus makes these conversions for you - just enter the code for the currency used in acquiring your inventory.
- Available On - This field will either be blank, or the same as what you entered on the initial page. You can change this field whenever you like.
- SKU - This field will either be blank, or the same as what you entered on the initial page. You can change this field whenever you like.
- Weight - The product's weight in ounces. May be used to calculate shipping cost.
- Height - The product's height in inches. May be used to calculate shipping cost.
- Width - The product's width in inches. May be used to calculate shipping cost.
- Depth - The product's depth or breadth in inches. May be used to calculate shipping cost.
- Shipping Categories - You will learn about setting up Shipping Categories in the Shipping Categories.
- Tax Category - You will learn about setting up Tax Categories in the Taxes Guide.
- Taxons - Taxons are basically like categories. You will learn more about them in the Taxonomies Guide.
- Option Types - You can select any number of Options to associate your new product with. You'll learn more about Options in the Options Guide.
- Meta Keywords - These words are appended to the website's keywords you established in the Site Settings and can help improve your site's search engine ratings, bringing you more web traffic. They should be words that are key to your new product.
- Meta Description - The summary that someone sees when your product's page is returned in a web search. It should be descriptive but not overly verbose.
Images
A store whose products had no images to look at would be pretty boring, and probably not garner a lot of sales. It would be very time-consuming to have to upload, crop, resize, and associate several photos to each product, if you had to do so manually. Luckily, Solidus makes maintaining images of your products quick and painless.
Just click the "Images" link under "Product Details" on the right-hand side of the screen. Any images that you may have already uploaded will be previewed for you. To add a new image for your product, click the "New Image" button.
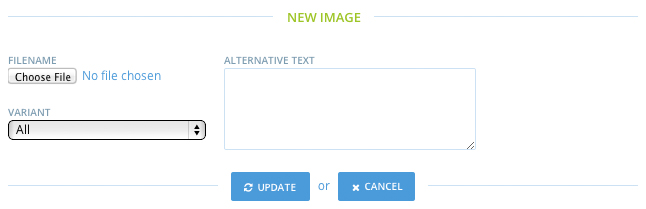
Select the Image file, and enter the Alternative Text for the image. Alternative Text is what appears when someone has their browser's image-rendering turned off, as with certain types of screen readers.
You have the option to associate a photo only with a particular "Variant" (again, more on Variants later in this guide), or with all of the product's Variants.
When you click Update, not only is the product photo uploaded, it is automatically resized and cropped to fit your store's requirements, and it is associated with the correct versions of your product.
Understanding Variants
Suppose that in your store, you sell drink tumblers. All of the tumblers are made by the same manufacturer and have the same basic product specifications (materials used, machine washability rating, etc.), but your inventory includes several options:
- Size - You carry both Medium and Large tumblers
- Decorative Wrap - Your tumblers come with the option of several kinds of decorative plastic wraps: Stars, Owls, Pink Paisley, Purple Paisley, or Skulls.
- Lid Color - The tumblers also come with with an assortment of lids to match the decorative wrap - the Star tumblers have Blue lids, the Owls have Orange lids, the Pink Paisley have Pink lids, the Purple Paisley have White lids, and the Skulls can be purchased with White or Black lids.
Given this inventory, you will need to create a Drink Tumbler Product, with three Option Types, the corresponding Option Values, and twelve Variants:
| Size | Wrap | Lid Color |
|---|---|---|
| Large | Stars | Blue |
| Small | Stars | Blue |
| Large | Owls | Orange |
| Small | Owls | Orange |
| Large | Pink Paisley | Pink |
| Small | Pink Paisley | Pink |
| Large | Purple Paisley | White |
| Small | Purple Paisley | White |
| Large | Skulls | White |
| Large | Skulls | Black |
| Small | Skulls | White |
| Small | Skulls | Black |
The Option Types you would create for this inventory are - Size, Wrap, and Lid Color - with the corresponding Option Values below.
| Option Type | Option Values |
|---|---|
| Size | Large, Small |
| Wrap | Stars, Owls, Pink Paisley, Purple Paisley, Skulls |
| Lid Color | Blue, Orange, Pink, White, Black |
Read the Product Options Guide for directions on creating Option Types and Option Values. You must establish your Option Types and Option Values before you can set up your Variants. Don't forget to associate the Option Types with the Tumbler product so they'll be available to you when you make your Variants.
Creating Variants
Now that you have set up the appropriate options for your Product's Variants and associated those options with the product, you can create the Variants themselves.
Let's create the large, star-wrapped, blue-lidded tumbler Variant as an example. You can then use the same approach to creating all of the other Variants we mentioned earlier.
On your tumbler product edit page, click the "Variants" link. Click the "New Variant" button.
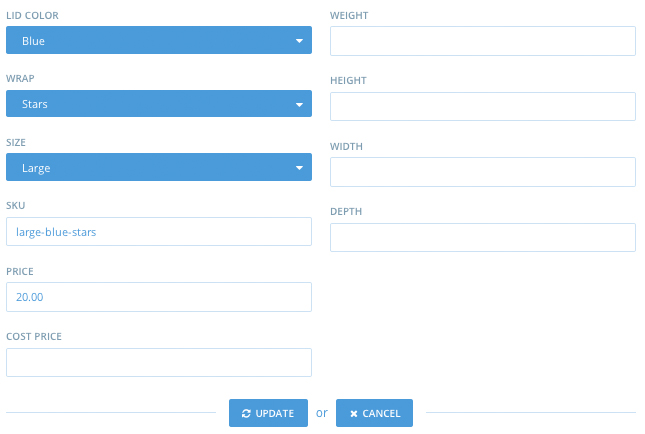
Select the appropriate values for the Option Types. As you can see, you also have the choice to enter values for this particular Variant that may be different from what you input on the Product's main page. Let's raise the price on our Variant to $20. Click the "Create" button.

Product Properties
You can set as many individual product properties as you like. These include things like the item's country of manufacture, material(s) used, design style, etc. Typically, these are characteristics that do not change across variants of a product.
You can read much more in-depth information about this feature in the Product Properties Guide.
Stock Management
You can learn more about stock locations in the Stock Locations Guide, but for now it's enough to understand that you enter the number of each product variant that you have at each of your individual stock locations.
Let's assume that you have two stock locations - your main New York warehouse and your satellite Detroit warehouse. Refer to the instructions on creating stock locations in the Stock Locations Guide to add your warehouses.
Now, go back to the Tumblers product page, and click the "Stock Management" link.
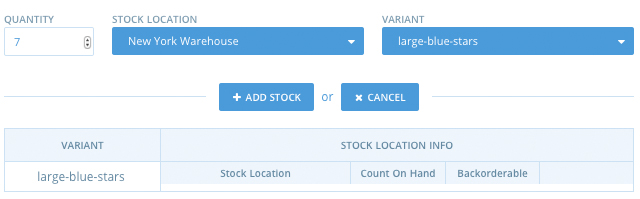
For this guide, let's say we want to say that we have 7 of our tumbler variant in the New York warehouse, and 3 in Detroit. To accomplish this, change the quantity to 7, select "New York Warehouse" from the "Stock Location" drop-down list, and select "large-blue-stars" from the "Variant" drop-down list. Click the "Add Stock button".
The "Stock Location Info" table will update, showing you that there are 7 of these items in the New York warehouse. Repeat these steps, adding 3 tumblers from the Detroit warehouse.
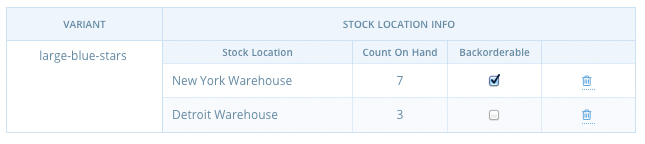
Your Stock Location Info table should now look like the one pictured above.
"Backorderable" may or may not be checked for your individual Stock Locations, depending on how you configured them. Each Stock Location has defaults for this value, but you can change it on a variant-by-variant basis in this dialog.
You should be sure to read the Stock Locations and Stock Movements guides for further information on managing your store's inventory.